Context: I’m building an additive synthesizer in JUCE, a C++ framework specialized for desktop and mobile audio apps and plugins.
Painting in JUCE is relatively complex. As soon as you start layering components on top of each other, odds are you’ll need to dig a bit deeper to understand a bit about how the operating system and JUCE itself handles painting.
When I started with JUCE, I felt like I was on a treasure hunt. Looking for answers in docs, tutorials, forum posts and demo code. I wanted to piece together a mental model around some of the big picture concepts — like components and painting.
JUCE’s learning resources tend to be high quality but spotty. The official docs can be terse and often assume a strong familiarity with the bigger picture, related classes, etc. Many higher level concepts around painting are implicit and not documented at all.
“Pros” often know how to do things because they figured them out the hard way: reading through the source, combing through the forum, trying things out, asking questions, raw perseverance. If you find yourself struggling to understand a concept, keep in mind that even the veterans wrestle with understanding some of these details.
So if you understand JUCE components at a basic level (what paint() and resized() do) but are murky about how it’s all put together (especially around some of the intricate methods like setPaintingIsUnclipped) — this post can help.
What are the basics?
It’s a rite of passage: A JUCE n00b is stuck trying to get their component to show up. A child component should be visible once you’ve called addAndMakeVisible, right?
Well…. here’s a short list of concepts you should feel solid on before reading the rest of the article:
- Components are organized hierarchically in a tree structure.
- To be visible, a component needs to be added to a parent component with
addChildComponentand made visible withsetVisible. This can be done in one step withaddAndMakeVisible. - Components have to be given a size to be visible.
- The point
0,0refers to the top left corner (x, y) of a component. - A child component bounds are typically set in the
resized()method by passing in a rectangle — x, y, width, height is your life now.
How does painting happen, though?
Ok, let’s dig into the bigger picture.
The operating system is what actually triggers a paint call (via the host application if in a plugin). The OS calls through to handlePaint on the actual operating system specific window. This window is what JUCE call a ComponentPeer. You’ll sometimes see this called a “heavyweight” peer.
As the parent and child component tutorial summarizes:
- First, component’s overridden
paintfunction is called. - Next, child components paint in the order that they were added to the parent.
- Lastly,
paintOverChildrenis run.
So, starting with the top most component (such as the plugin editor), components are painted serially (one at a time) down through the component hierarchy (as long as isVisible() is true).

setBufferedToImage
I think of this as “cache expensive drawing in an image, which is cheap to repaint”
It’s inefficient to keep painting the same thing over and over again.
For these cases, JUCE provides setBufferedToImage (true). This tells JUCE to cache the result of painting a component into a juce::Image.
When it’s the component’s turn in the hierarchy to paint, now it won’t bother calling paint on itself and its children. Instead, it’ll hand back the cached image.
This cache is invalidated when repaint() is called on the component or any of its children.
It’s best to only call setBufferedToImage on “leaf” components that have no children, as a child repaint will force a repaint, subverting the whole point. Move the expensive logic into another child and call setBufferedToImage on that.
Good use cases for setBufferedToImage (true) are:
- When a component is fairly expensive to paint (rendering lots of text, images, path segments, etc) and doesn’t change that often.
It’s not a good idea to use setBufferedToImage (true) when:
- The overhead from creating and rendering a
juce::Imageis more expensive than what the component and children will paint (for example, just a few rectangles, no children, etc). repaint()is called frequently, such as animating some movement on a Timer (for example, it doesn’t make sense to cache something likeCaretComponent). This is because you’ll be doing extra work (creating the cached image) without being able to ever use it.
Repaint
repaint() does what it says on the box.
Or does it? It’s important to know that calling repaint() doesn’t actually call a component’s paint() function — not even asynchronously.
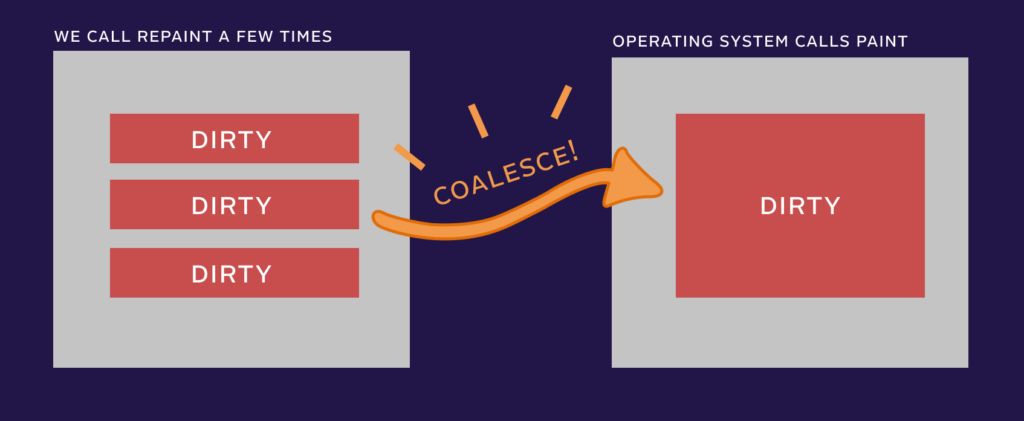
All repaint() does is flag the component’s bounds as dirty. That repaint call then propagates up through the component hierarchy until it reaches the “peer” (the actual OS window). The peer informs the OS which regions of that window are dirty/invalidated and need repainting (see Windows docs, MacOS docs).
These dirty regions are sometimes coalesced (grouped together) by the OS (and in some cases by JUCE itself). Later, when the OS (or host) calls paint on your app, the dirty region (plus or minus some regions that the OS might decide on) is set as the “clip bounds” on the top level paint call.

One benefit of knowing what repaint actually does: you can get specific and choose to just flag a subset of the component as dirty, flag the component’s parent as dirty, etc:
void Component::repaint (int x, int y, int w, int h)
void Component::repaint (Rectangle<int> area)
Clipping
Clipping can sound intimidating. The concept is used all over the JUCE codebase, in several different contexts. You’ll see references everywhere to clipBounds or clipRegion in JUCE.
Clipping conceptually just boils down to “reducing a region”. Think of it as whittling down a big rectangle to a smaller one.
Why? For efficiency’s sake. We only want to paint regions that are dirty or scoped to a specific component. We don’t want to repaint our whole entire UI at 60fps (shout out to immediate mode tho).
Example: Your UI is open and you hover over a button. The button is told to display its hover state. The button background turns from gray to blue.
It would be expensive to paint the whole UI just because something small like a button state changed. Instead, the button’s bounds are marked as dirty. Those bounds are bubbled up to the OS. When the OS decides it’s time to paint, it’ll pass the clipped region that needs to be updated back to your plugin editor (or main component).
Clipping makes things relative
So right off the bat, there’s a clipped region in play in the paint call.
Travelling top-down through the component hierarchy, paint is called on every child component that intersects with this “dirty” clipped region. The juce::Graphics& g reference is passed into the paint call with a clipRegion that’s temporarily scoped to the new component’s local bounds.
The clipped bounds also helps you do all of the relative painting within a component’s bounds. It’s how things like g.fillAll() work and why 0,0 always refers to the top left of the component.
Keep in mind, there’s nothing stopping you from manually checking g.getClipBounds() in your component’s paint call. For example, you could use it to bypass expensive painting in one section of your component. (Arguably, this is the whole point of breaking things into child components, though).
setPaintingIsUnclipped
I think of this as “get rid of all the component overhead for transparent components”
setPaintingIsUnclipped is for components that
- don’t use
g.fillAll() - just have simple drawing
- don’t have child components (aka are “leaf nodes” in your component tree)
- you are happy with always painting when they intersect with dirty bounds
This is described in the docs as a performance optimization: JUCE won’t bother clipping the graphics context any further, it won’t check for obscured regions and it won’t read from the setBufferedToImage cache — it will bypass all that work and just paint the whole component.
As Tom said: “Lots of simple components should be more or less the same speed as lots of simple drawing if you enable setPaintingIsUnclipped.” So again, it’s just a way to avoid some overhead from the JUCE component logic. It can encourage you to break apart simple drawing into additional child component leaf nodes without paying a cost for doing so.
However, beware! The component’s paint method will be called every time the component’s bounds intersect with what the OS considers dirty. So, although this setting is described as an optimization, it can cause unintentional performance problems. You might end up painting something much more frequently than intended.
The docs warn:
If you enable this mode, you’ll need to make sure your paint method doesn’t call anything like Graphics::fillAll(), and doesn’t draw beyond the component’s bounds, because that’ll produce artifacts.
The name “unclipped” unfortunately presumes an intimate understanding with JUCE’s painting system without really conveying much intention about usage. Perhaps a name more along the lines of leafNode or simpleDrawingOnly or efficientDrawingMode would better clarify usage.
To help illustrate usage: the only “widget” in the JUCE framework that uses setPaintingIsUnclipped is the CaretComponent — a 2px filled rectangle that’s going to always paint whenever a TextEditor is being painted — so may as well bypass that extra component logic.
Tip: In addition to avoiding g.fillAll(), remember that “unclipped” means getLocalBounds and friends won’t be clipped to be relative to your component (it’ll be clipped to the parent component).
setOpaque
I think of this as “when I’m dirty, don’t bother repainting my parent.”
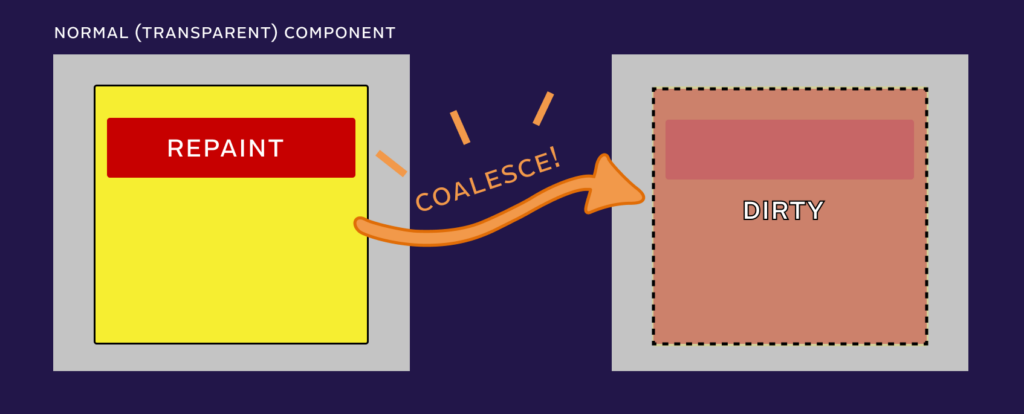
By default, components are transparent.
This means that if you call repaint to flag a component as dirty, whatever is underneath the component will end up repainting as well.

To be clear: if you put a component on top of another one and call repaint on the top one, they’ll always both repaint. JUCE doesn’t care if you are actually taking advantage of the transparency. It will paint everything just to be safe.
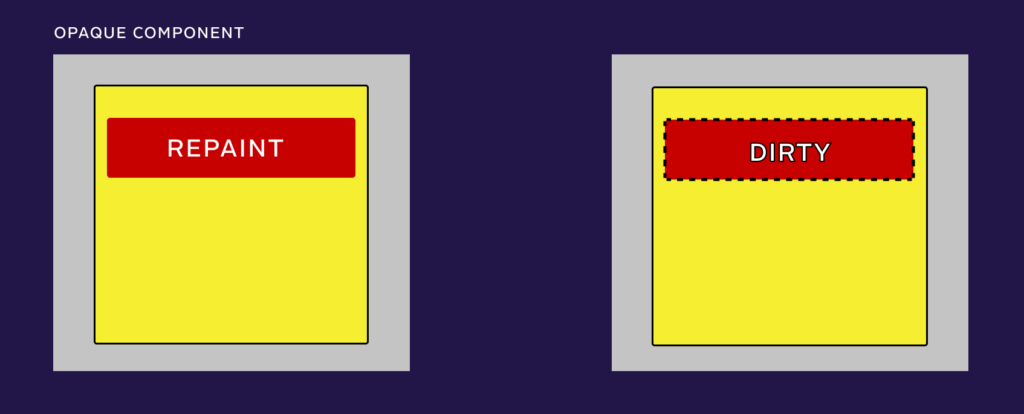
However, if you know your component will be completely filled from edge to edge — for example using g.fillAll() — you can take advantage of setOpaque (true). This provides you with the often desirable effect of not having everything under the component repaint.

As the source code comments say: You must implement the paint function and ensure the component’s area is completely filled. Otherwise, you’ll end up with glitchy artifacts.
One tip: Modern design tends to use rounded rectangles. This might feel like it rules out taking advantage isOpaque (true). However, if you are desperate to get the performance benefits, there are two options:
- If the parent component sits on a solid color background, use
g.fillAll()to first fill your component with the background color and then draw your filled rounded rectangle. - If the parent background has an image/gradient background, draw your rounded rectangle in your transparent component and consider it just a wrapper component of a new opaque component. Move all the expensive drawing into that opaque grandchild.
Semi-automatic repaints
One thing that might take you by surprise when debugging paint calls — repaint() is called by many other juce::Component methods.
setVisible repaints
setVisible (true) calls repaint().
Note that it only does this if the component was not visible before the call. So callbacks on the component and listeners won’t fire on successive multiple setVisible (true) calls.
setVisible (false) calls repaintParent, but again, only if the component was visible before the call. This is because it’s needed to paint “behind” where the component was before it gets hidden.
setBounds calls repaint
setBounds only calls repaint if
- the component
isShowing() - the bounds size actually changed.
The latter is important, as it means you can setBounds of a component within its own resized call (for example to rely on font.getStringWidth) without it being a recursive nightmare.
setSize just calls setBounds with the current x/y position.
When calling setSize or setBounds in a constructor, I make the habit of doing it last, after all child components have been added.
setBounds also invalidates the cached image when setBufferedToImage is true.
Almost all JUCE “widgets” call repaint internally
At some point, you might wonder why repainting is occurring so aggressively. The answer is often: repaint is called all over the place in the JUCE widget library.
To debug issues, you’ll have to read the source to understand when repainting is being triggered.
This ends up being one (of many) good reasons why I believe the JUCE widget library is often best used as an example to borrow code from to hand roll your own components vs. used off the shelf (more on this in another post).
Other JUCE component tips
isVisible() vs. isShowing()
A component only paints when isVisible() is true.
Unfortunately, isVisible() doesn’t actually tell you if the component is visible on the screen. A more accurate name would be paintingEnabled() — it’s only a flag in the component, not the actual state of on-screen visibility.
isShowing() is checks the actual state. It checks that
-
isVisible()is true - the parent and its ancestors
isShowing()is true - The peer (actual window on the OS desktop) isn’t minimized
This is an important distinction.
For example calling addAndMakeVisible in a constructor will immediately call setVisible on the child component before anything is visible on screen (and before it calls addChildComponent).
Screen Record jank
If you are seeing painting “jank” (for example, parts of components being painted at different times) but can’t quite understand what’s happening:
- Screen record it to step through it easily frame by frame
- Check out my post on jank in JUCE
LookAndFeels apply to all children
This is a bit random, since we didn’t really dig into JUCE’s LookAndFeels. But one thing worth knowing is that when you call:
setLookAndFeel (&myLookAndFeel);it will recursively set the look and feel of every child.
There exist some cases in JUCE’s widget library where sub-components aren’t technically children, but pointers to other components. If you find yourself wondering why a LookAndFeel isn’t “taking” in the widget library, you may find you have to explicitly set the LookAndFeel on those sub-components on their construction.
Don’t make LookAndFeels for your custom components
LookAndFeels exist for one big reason: so that JUCE’s “widgets” can be more easily customized by framework users.
However, unless you yourself are creating a UI framework, don’t bother making LookAndFeels when rolling your own components. It complicates things unnecessarily.
Just do your painting in the paint method. Done.


Leave a Reply