
2024 Update: I highly recommend avoiding third party certs now that Azure Trusted Signing has launched. View my guide on how to setup Azure Trusted Signing.
This post walks through what it takes to code sign Windows installers in the cloud with an Extended Validation (EV) cert. It is current as of 2024.
This process is surprisingly difficult and not well documented. It’s enough of a problem that in 2022, I cold-emailed the CEO of GitHub about the difficulty of building deployable Windows apps on GitHub infrastructure. I ended up speaking with several helpful members of the GitHub Actions team about improving both the process and the documentation.
Until then, come navigate this just-barely-functional world of enterprise code signing with me.
Why Bother?
Your installer will throw up a Malware warning on Windows by default.
That’s a bad thing.
Installation is the start of the user’s first experience with your product. Adding friction at the start is unfriendly — especially for less technical users, who might not know what action to take. (Microsoft adding this much friction to the code signing process is also unfriendly, but hey, that might be finally changing!)
To resolve this friction, you’ll need to cough up and pay the certificate mafia a yearly fee for an “Extended Validation” (EV) code signing certificate.
No, you don’t want the (cheaper) OV cert. That’s a pain in the neck and it will still throw up Malware warnings under circumstances you can’t control — especially while getting started as a business. Each binary will need to “gain reputation” over a certain amount of time (a month?) before it’s marked as safe.
Only the EV cert solves the issue completely.
Reallllly adverse to paying money and / or reallllly new and small and indie? In that case you can try manually uploading your binaries to be analyzed by Microsoft. You can do this if they are triggering smart screen or even preemptively before having users download them. I’ve been hearing some indie devs say this helps the individual binary gain (good) reputation. You’ll need to manually upload every single version though…
What’s the damage?
On macOS, you pay a flat rate to Apple to have a dev account — a code signing cert and service is just one of the many benefits. Plus, you can store that cert itself as a secret in CI. Life is easy.
On Windows, it’s currently nasty:
- You need a EV cert from a third party issuer (not Microsoft). You’ll have the absolute pleasure of selecting which one of the cabal of slow moving, expensive enterprise companies (sporting websites looking like they were made in 1999) you’d like your soul crushed by.
- It’ll cost you to interact with these cert issuers, both in time and money. I paid 709 EUR for a 3 year cert.
- The “old school” method is still dominant: Certs are deployed on a physical dongle, referred to as a Hardware Security Module (HSM). That’s pretty incompatible with modern development workflows that use CI… which is the motivation for this blog post.
- Luckily, the industry is in transition (read: 🐢🐢🤑) and both Google and Azure offer “cloud HSM” services. So…. Microsoft won’t offer you the cert, but they’ll host it. And you’ll might need to pay a bit ($5/mo) for opportunity to store your cert on a cloud HSM.
We’re going to use Azure to store the key and GitHub Actions to do the signing. If you just want to fast forward to the end result, check out my Pamplejuce template on GitHub.
Prefer Google as your corporate overlord of choice? Apparently someone made a GitHub Action for Google KMS and Michał has written an extremely extensive article on his journey with Google KMS.
Prefer Amazon? Sorry, they don’t support OV/EV storage at this time.
Step 1: Get the EV cert process started
I went with GlobalSign because they advertise and have explicit support for using Azure as certificate storage.
When ordering, make sure you are NOT getting a physical key. On GlobalSign, for example, you want to buy the HSM Implementation.
Do not buy ECC certificates (such as ECDSA) from providers like Sectigo or resellers. You’ll need an RSA only certificate to pass SmartScreen. I know 2-3 very unhappy devs who were assuming ECC would work (and were sold “ECC code signing” certificates from resellers).
Let me know in the comments if you’ve tried other providers. One commenter went with Sectigo, waited months, only to find the cert didn’t work with Azure for some reason. After reading this article, they later saw success (1 week turnaround) with GlobalSign.
It cost me 709 EUR for a 3 year cert. I’m hoping to set-it-and-forget-it for 3 years. Despite how much fun I’m having, I don’t want this to be an annual event.
Expect the vetting process to take a while (a couple weeks). It can take longer (months) if you reside in a smaller country and have documents (business license, proof of address, ID) that require notarized translations. My German language documents were accepted as-is. Obviously English documents are fine, too. In other cases, you may need to provide notarized translations.
Regardless, place your order and kick things off early. They might want things from you like a letter from your accountant, snail mail to confirm your address, etc.
Step 2: Sign up with Azure & create an Azure Key Vault
Azure offers a “Premium” HSM product as a part of Azure Key Vault.
I haven’t used Azure before this. It looks a lot like Amazon AWS — wayyy too many services with wayyyy too much config and wayyyyy too much admin. People now have full time jobs specializing and getting certified in these platforms! Which says a lot about their UX.
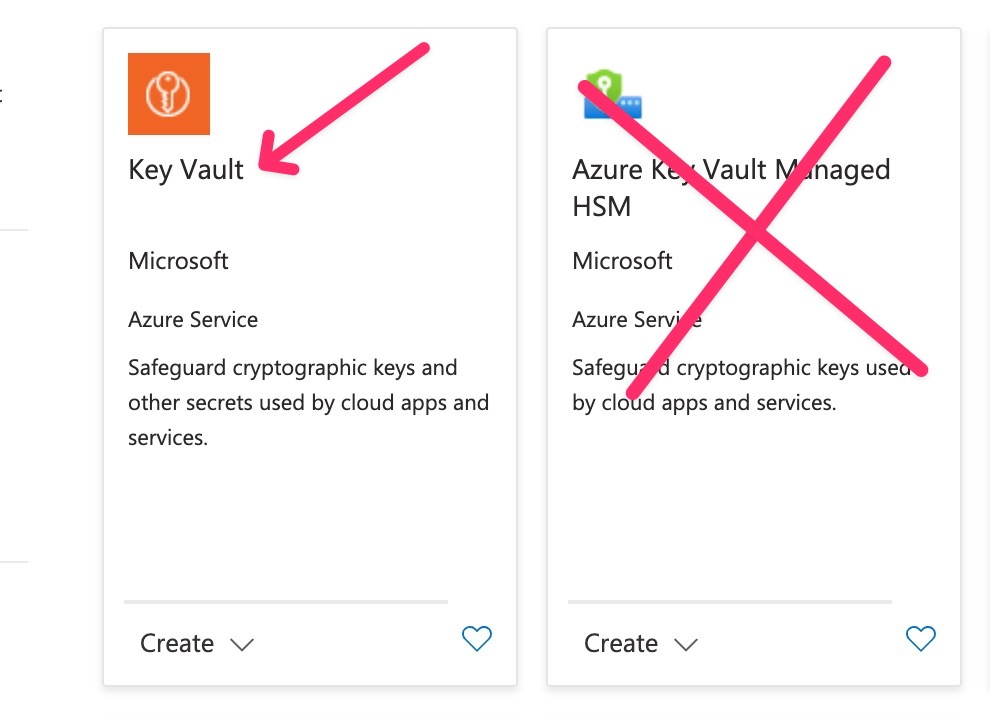
There are three flavors of Vaults on Azure, just to confuse you: Standard, Premium and “Managed.”
You want to create the “Premium” HSM Key Vault which lets you store the fancy HSM certs.
A reader was confused by the fact that Azure also offers managed HSM. This is for an expensive, single tenant, dedicated, full-control-over-the-hardware type thing. You don’t need this. You want the shared tenancy, Premium HSM Key Vault.
After logging in, click + Create a Resource and search for Key Vault.
Give it a name, a resource group and choose Premium/HSM in the Pricing Tier options:

Next go to the Access Configuration tab and select Vault Access Policy and give your Azure user account access.
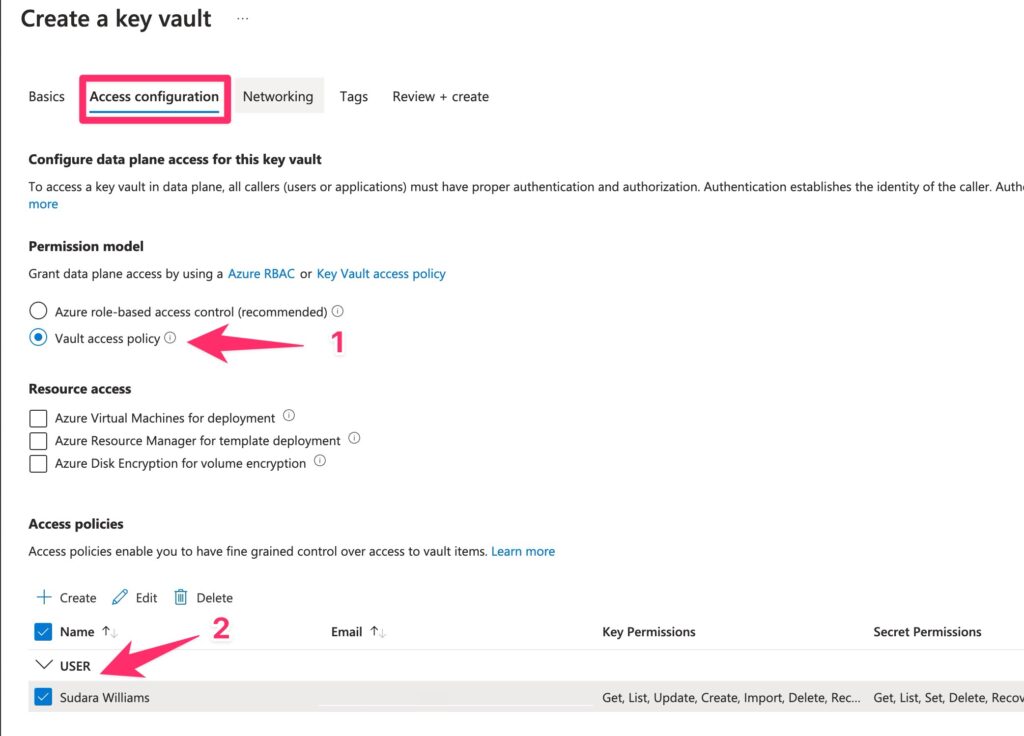
If anyone is feeling adventurous, you can try the new Azure RBAC policy and report back to me, but Vault Access Policy was the only option when I signed up. It works well.
It’s currently $5/mo per cert. They sometimes have promotions going on that offer free service for a year, etc.
Note your key vault name, the subscription-id, the resource-group and the uhhh… the Key Vault’s https URI (🤷♂️ don’t ask). We’ll need that all later.
Step 3: Create a CSR and generate your cert
Once you are vetted and can actually generate a certificate by your favorite Third Party Corporate Vulture, it’s time to create the Certificate Signing Request (CSR) on Azure:
GlobalSign has instructions on how to generate the CSR.
The quick overview is:
- Go to your newly created Key Vault.
- Click
Certificatesin the left hand navigation. - Click the
+ Generate/Importtab up top. - Fill out the form with information from your issuer.
Important: You have to edit a few things in the Advanced Policy Configuration
- Make sure “Exportable Private Key” is set to “No”.
- This will then let you select RSA-HSM as the key type.
- Pick 4096 as your key size (assuming your issuer issued this size).
RSA-HSM key type is required by GlobalSign as of June 2023. Choosing this means Azure will store the certificate on FIPS 140-2 level 2 certified HSM.
Commenters have also discussed the EKU field. I used the example provided by GlobalSign, another reader used defaults, and another reader was asking if they should use the explicit code signing EKU 1.3.6.1.5.5.7.3.3. The consensus is that it doesn’t matter, the issuer should place the correct EKU in the cert.
Note the certificate name you used on Azure — you’ll need it for the signing step later.
Step 4: Setup an Azure “Application”
The point of this step is to create some credentials to do the signing with Azure’s CLI tool.
Install the Azure CLI on Windows. On macOS, you can brew install azure-cli.
This will pop open a browser window to authenticate you:
az loginNext, ask your local wizard for the precise incantation and/or decipher this cryptic disaster. You’ll need the subscription-id (it’s a uuid) and resource-group (it’s a name) from Azure.
az ad sp create-for-rbac --name "myApp" --role contributor --scopes /subscriptions/{subscription-id}/resourceGroups/{resource-group} --sdk-authmyApp is arbitrary. It’s the name of the Azure “Application” you are creating which will do the signing. You could call it “GitHub” or whatever you call your CI workflow.
You’ll get back something magnificent:
  {
    "clientId": "{uuid}",
    "clientSecret": "{uuid}",
    "subscriptionId": "{uuid}",
    "tenantId": "{uuid}",
  }
Make sure to save this entire awkward json result somewhere safe for now. You’ll need to reference it.
Step 5: Add permissions to your Azure client
Use the clientId uuid you just got and the key vault name to give your client the appropriate permissions. You can also do this through the UI if you like.
az keyvault set-policy -n {keyVaultName} --key-permissions sign --spn {clientId}Disregard the garbage output. Toss it out with your indie integrity. Er, you can manually inspect the output json to check to be sure the actual permissions were added.
Oh, but don’t forget: We need to actually get the cert before we can sign with it:
az keyvault set-policy -n {keyVaultName} --certificate-permissions get --spn {clientId}To verify all went well, navigate to your Key Vault in Azure.
Under “Settings” click “Access Configuration” and then “Go to Access Policies.”
You should see an “Application” with the Sign Key Permission and the Get Certificate Permission.

Step 6: Package things up
Do you have something to actually sign yet?
InnoSetup is what many people package Windows installers with.
It is on the list of pre-installed software on GitHub Action’s windows-latest (Windows Server 2022) environment. So on GitHub you don’t need to install anything to create an installer that installs things.
Yes, msix is a thing. If you can figure out how to do that nicely with a few lines of easy to read config, let me know! It looked like an unfriendly birds nest of xml and json to me. 🪹🍝
Step 7: Sign with Azure SignTool
Things get a bit hairy now.
Azure provides docs around accessing keys from GitHub Actions, however they reference a now-deprecated Azure-official GitHub Action which leads to some dead end suggesting to “pass a custom script” to the more general Azure CLI Action.
Corporate dysfunction aside, our goal is to use something something like signtool (Window’s code signing program) to sign things with the cert.
Enter Azure SignTool.
This (somewhat confusingly) is an unofficial project run by a GitHub employee, but referenced by official Microsoft documentation as The Way to Sign with Azure Key Vault and The Way To Use Key Vault for GitHub Actions Secrets. However those are only pieces of the puzzle and contain some issues, so I recommend following this flow:
Add AzureSignTool as a step in CI like so:
dotnet tool install --global AzureSignTool Note that you don’t need to run the az tool to login, like you might see in other guides.
Ready for more magic incantations?🪄
You’ll run this command to actually sign your installer:
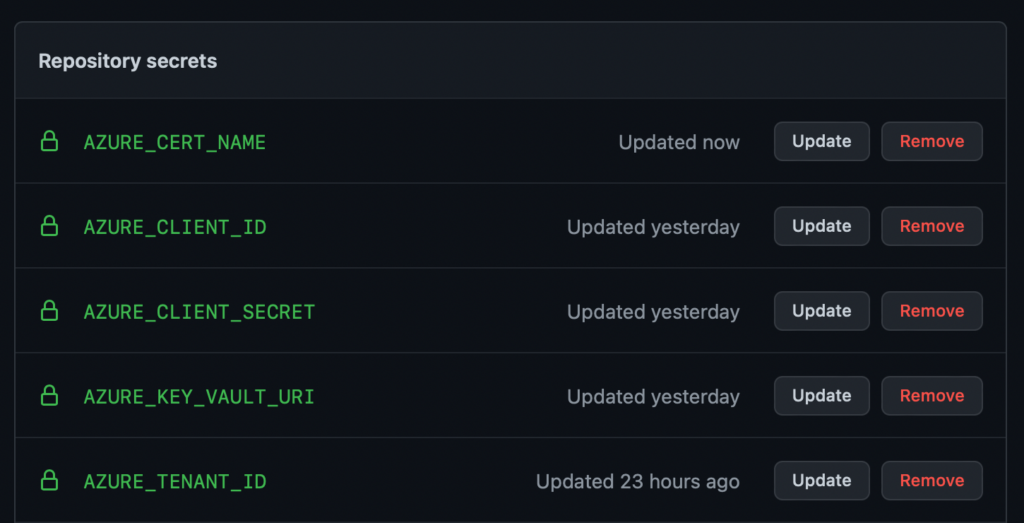
AzureSignTool sign -kvu "${{ secrets.AZURE_KEY_VAULT_URI }}" -kvi "${{ secrets.AZURE_CLIENT_ID }}" -kvt "${{ secrets.AZURE_TENANT_ID }}" -kvs "${{ secrets.AZURE_CLIENT_SECRET }}" -kvc ${{ secrets.AZURE_CERT_NAME }} -tr http://timestamp.digicert.com -v yourInstaller.exeThis means adding the following 5 secrets to your GitHub repo:
AZURE_KEY_VAULT_URI For unknown reasons, this is an https URI? It is located on your key vault pageAZURE_CLIENT_ID (uuid from the awkward json result we had above)AZURE_CLIENT_SECRET(string from the awkward json)AZURE_CERT_NAME This is just the name of your cert on Azure, you can grab it from the UI. Note that the official Microsoft docs for pipeline signing call this “AzureKeyVaultName” which is terrible — both the key vault and the certificate have names. You’ll want to pass the certificate name to -kvc. AZURE_TENANT_ID (uuid from awkward json)
You did it!
This is what the final result might look like on GitHub Actions:
    - name: Generate Installer and Sign with EV cert on Azure (Windows)
      if: ${{ matrix.name == 'Windows' }}
      shell: bash
      run: |
        iscc "packaging\installer.iss"
        mv "packaging/Output/${{ env.PRODUCT_NAME }}.exe" ${{ env.ARTIFACTS_PATH }}/
        dotnet tool install --global AzureSignTool
        AzureSignTool sign -kvu "${{ secrets.AZURE_KEY_VAULT_URI }}" -kvi "${{ secrets.AZURE_CLIENT_ID }}" -kvt "${{ secrets.AZURE_TENANT_ID }}" -kvs "${{ secrets.AZURE_CLIENT_SECRET }}" -kvc ${{ secrets.AZURE_CERT_NAME }} -tr http://timestamp.digicert.com -v "${{ env.ARTIFACTS_PATH }}/${{ env.PRODUCT_NAME }}.exe"
You can check Pamplejuce, my C++/JUCE audio plugin template repo which runs this action on every build.
Troubleshooting: Azure Permissions
If you get far enough along that you are having permission issues — congratulations! So close!
Luckily the az error output is actually pretty decent! For example, I was missing the “certificate get permission” and got the error does not have certificates get permission on key vault.
Troubleshooting: A certificate with (name/id) *** was not found in this key vault.
I ran into this one. Make sure you are passing your certificate name, not your key vault name as the value to -kvc.
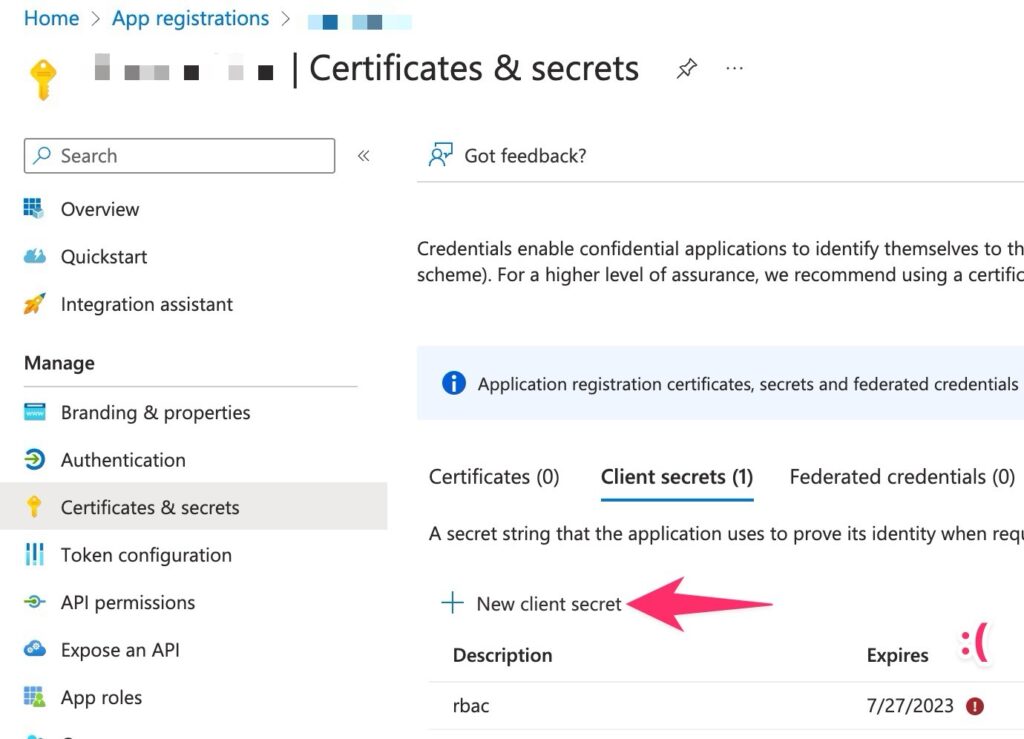
Troubleshooting: The provided client secret keys for app ‘***’ are expired.
I ran into this after 2 years on CI. The client secret is only valid for a max of 24 months. You’ll need to generate a new secret, see the official docs for more. It’s pretty easy, you’ll just need to click New client secret in App registrations, and then update the secret where needed in CI.


Leave a Reply